Creating realistic 3D assets is still a tough challenge, especially when balancing high-quality geometry with rich, physically accurate textures. Hunyuan3D released by Tencent, is a scalable 3D asset creation system that pushes the state of the art with two key innovations. Its a fully open source framework and physically based rendering (PBR) texture synthesis.
By releasing all model weights and training code, Hunyuan3D-2.1 empowers the community to fine tune and adapt the system for diverse applications, speeding up research and real-world deployment. Its new PBR pipeline replaces traditional RGB based texture models, producing highly realistic materials with accurate light effects like metallic reflections and subsurface scattering.
 |
| Hunyuan3d pipeline explanation (Ref- Official page) |
Benchmark tests show that Hunyuan3D-2.1 outperforms both open and closed source baselines in texture quality and condition following ability. Under the hood, it builds on Hunyuan3D 2.0 a large scale 3D synthesis system with two core components. You can get detailed overview on their hunyuan 3d v2.1, hunyuan3d v2.0 research papers.
Model types:
Hunyuan3D-DIT(v2.0, v2.1, v2.5) - a scalable, flow-based diffusion transformer that shapes 3D geometry to match a given image.
Hunyuan3D-Paint - which applies vivid, high resolution textures to both generated and handcrafted meshes.
They also have Hunyuan3D Studio provides a user-friendly platform where professionals and amateurs can easily edit and even animate their assets. Evaluations confirm that Hunyuan3D-2.0 also surpasses other state-of the art systems across geometry detail, texture realism, and condition alignment.
Installation
1. Setup Comfyui if you are a new user. Old user have to update ComfyUI from the Manager Tab.
2. You can install Hunyuan 3D custom nodes from the Manager section(using Custom nodes manager option) by searching "Hunyuan3d" or Manually installation also available. This custom node supports hunyuan3dv2.1, v2.0, multi view, mini, turbo models.
To do manual installation, open the "ComfyUI/custom_nodes" folder and use this git cloning command :
git clone https://github.com/niknah/ComfyUI-Hunyuan-3D-2.git
3. Setup required dependencies. Navigate to "custom_nodes/ComfyUI-Hunyuan-3D-2" folder. Open requirements.txt file, remove "python-dev" named library and save the file as this will cause dependencies errors.
Now use these commands to install dependencies on your command prompt:
pip install -r requirements.txt
git submodule update --init
4. Now install hy3d gen inside "custom_nodes/ComfyUI-Hunyuan-3D-2" folder using this command:
pip install hy3dgen
5. The Hunyuan3D models and required files get auto-downloaded, when you run workflow at initial stage. You can track real-time downloading status on ComfyUI terminal.
6. Finally, restart you ComfyUI and refresh it.
Workflow
1. After the custom nodes installation, you get the workflow inside your "custom_nodes/ComfyUI-Hunyuan-3D-2/example_workflows" folder.
2. Just drag and drop into ComfyUI.
3. Setup and follow the generation steps:
(a) Upload the image you need to convert to 3d.
Make sure you use the image with transparent background. This supports well for 3d view and do not take much longer generation time.
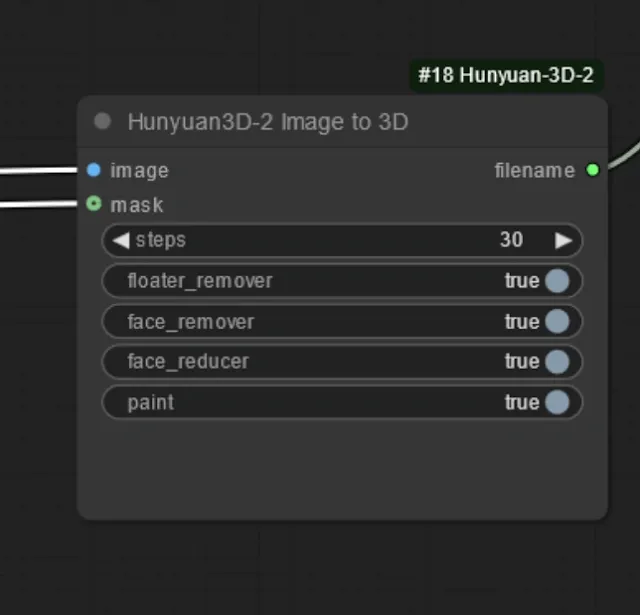
(b) Choose these setting inside Hunyuan3D-2 Image to 3D node, Select the Hunyuan3D Dit model :
steps (default: 30)
This is the number of diffusion or processing steps that Hunyuan3D will take to construct the 3D representation.
More steps = more refined output, but also takes more time.
Lower steps = faster, rougher output.
floater_remover (default: true)
Enabling this option tries to remove stray artifacts or disconnected floaters that often appear when converting an image to 3D - making the resulting 3D model cleaner.
face_remover (default: true)
This option, when enabled, will remove faces detected in the image, often to avoid generating unintended realistic human faces or potentially for privacy.
(Useful if the image contains people and you do not want faces in the output.)
face_reducer (default: true)
This reduces the level of face detail - if face_remover is off, this will make sure any detected faces are less prominent and less realistic.
paint (default: true)
This enables some painting or inpainting process to fill gaps after floaters or faces are removed - helping make the final 3D output look complete.
Well, to use inpainting you have to use the older Hunyuan model. These settings help you clean up the image for a better 3D representation. Turning on removers and painting is good when your image contains people or extraneous elements. Reducing steps is faster but lowers quality; increasing them yields a nicer output at the cost of processing time.
At last, select smaller export button to download in blender format.


