Creating your own model stylized editor is easier. By training a LoRA for image editing, FLUX.1 Kontext [dev] is a powerful place to start on Windows/Linux based systems. We will follow the step by step process to train a LoRA specifically for Flux Kontext Dev using AI Toolkit UI.
It’s a 12B parameter rectified flow transformer designed to edit images based on natural language instructions with no fine-tuning needed for keeping styles, characters, or objects consistent. With robust multi-edit stability and open weights, it’s perfect for building custom workflows.
Table of Contents:
Requirements
1. For this, you need powerful NVIDIA RTX 4090/5090 series cards having at least 24 GB VRAM. For 4090 use Cuda 12.6 and for 5090 install Cuda 12.8 version. Lower VRAMs will struggle to handle the training for sure.
You can also rent powerful GPUs on Cloud servers like Runpod, Google Cloud, AWS that's hardly cost you 2-3$/hr and follow the Linux setup process.
2. You need to install Python greater than 3.10 version.
3. Install Git as per your OS(Windows/Linux) systems. MAC Systems are not supported.
4. Install NodeJs (should be greater than 18).
Step by Step Installation
1. First, to install the AI-Toolkit select your specific drive/folder where to install this UI software. We selected E DRIVE. If choosing a folder make sure the folder name do not have any space.
If you are an old user who already installed this UI, then these process are not required. Simply move to the Training section below.
2. Now, move into the folder and type "cmd" on the folder location bar that's open your command prompt.
(a) For Windows systems, use these commands to start installation:
Clone Ai tookit repository to your system:
git clone https://github.com/ostris/ai-toolkit.git
Move into ai-toolkit directory:
cd ai-toolkit
Create virtual enviroment named as "venv":
python -m venv venv
Activate virtual environment:
.\venv\Scripts\activate
For RTX 4090/5090 users, use torch and cuda 12.6:
pip install --no-cache-dir torch==2.7.0 torchvision==0.22.0 torchaudio==2.7.0 --index-url https://download.pytorch.org/whl/cu126
For RTX 5090 users, use torch and cuda 12.8:
pip install --no-cache-dir torch==2.7.0 torchvision==0.22.0 torchaudio==2.7.0 --index-url https://download.pytorch.org/whl/cu128
Finally install the required dependencies:
pip install -r requirements.txt
Do not close the command prompt. Now, time to start the training process. Lets, jump directly to the training section.
(b) For Linux/server environment, follow these commands:
Clone and install the repository
git clone https://github.com/ostris/ai-toolkit.git
Move inside ai-toolkit directory.
cd ai-toolkit
Create virtual environment
python3 -m venv venv
Activate virtual environment
source venv/bin/activate
For RTX 3090/4090/5090 users, use torch and cuda 12.6:
pip3 install --no-cache-dir torch==2.7.0 torchvision==0.22.0 torchaudio==2.7.0 --index-url https://download.pytorch.org/whl/cu126
For RTX 5090 users, use torch and cuda 12.8(for little faster execution):
pip install --no-cache-dir torch==2.7.0 torchvision==0.22.0 torchaudio==2.7.0 --index-url https://download.pytorch.org/whl/cu128
At last, install required dependencies
pip3 install -r requirements.txt
Now, time to setup Hugging Face Token that's required for Flux Kontext. You can jump directly to the training section if you already saved your token.
Setup Hugging Face Token
The Ai Toolkit WebUI used to control your whole training process. You can just start, stop and monitor its process in between. The WebUI has been developed on NodeJs that supports version greater than 18.
1. After installation, move into the ui directory:
cd ui
2. To initiate the WebUI, just use this command:
npm run build_and_start
To access the WebUI, use for local
http://localhost:8675
or for online servers use this. Replace <your-ip> with your actual IP.
http://<your-ip>:8675
Here, every time you want to open UI you have to move into ai-toolkit/ui folder, activate virtual environment and need to follow step1-2.
Their is also a simple trick thats going to fast your starting process, you do not need to do again and again. To do this, create Bat file anywhere using any editor & copy these commands into it and save as .bat file extension:
#########COPY############
@echo off
cd /d "E:\ai-toolkit\ui"
call npm run build_and_start
pause
###########COPY############
Here, inside cd /d "E:\ai-toolkit\ui" command, just replace the path name (inside inverted comma) with your ui folder's path. To get the path just find ui folder inside ai-toolkit directory, right click the ui folder and select Copy as Path option then save bat file.
From now onwards, you can directly click this bat file to open AI-Toolkit UI.
3. You will get AI-Tookit UI dashboard opened.
4. Move to Settings option on the left tab, where you need Hugging Face token for Flux Kontext Dev. Now, login to Hugging account and accept the license agreement for Flux Kontext Dev.
After accepting you will get the message "Gated model You have been granted access to this model".
5. Next, just create your access token from Hugging Face.
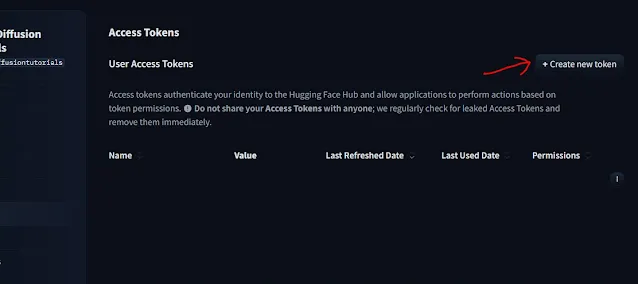
Select on "Create New token" option on the right section.
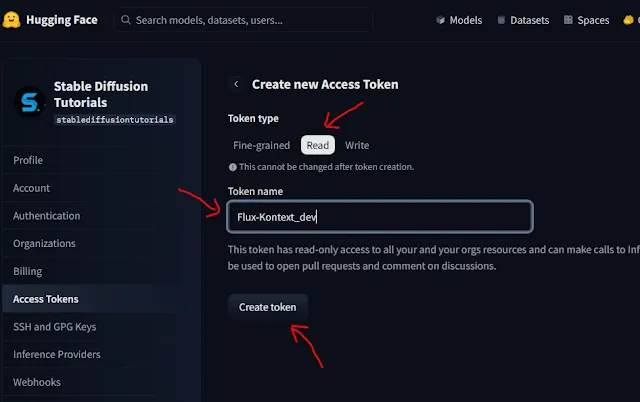
Choose Read tab option, then fill your token name and finally click Create token button.
6. Finally, Copy the created token and paste into Hugging face token field of AI-Toolkit dashboard. This will be once accessed so, by mistake if you do to get the token you need to create new one.
Then, put your training folder path where your LoRA file need to be saved. Here, output folder is the default location. You can choose any path if you want to or leave it as default.
7. Again, select the dataset folder path where your all sample images you stored for Flux Kontext Dev training. At last hit "Save settings" to make the configurations set.
Training Data set configuration
This is the crucial step to select the Data set. Here, data management will be little different then as usual LoRA training. Here, you have to choose what type of style you want to train your LoRA like Anime, Realism, Cinematic, Cyberpunk etc.
1. For this, three folders of dataset images are required:
(a) The first one (name as Before) should have the normal original 10-15 images.
(b) The second (name as After)one should have the end stylized 10-15 images.
(c) The third folder (name as Test) with random style 5 images for testing in every 10-15 epochs. This will be helpful while training and analyzing your LoRA model's quality.
You can generate these end images using Flux Kontext Dev basic workflow. 10-15 images works best for any LoRA training. All the images should be in serially named like image_1.png, image_2.png, image_3.png.........etc. and maintain the same image extension.
For example- Lets say we want to train our LoRA in Anime style. So, we took 10 normal images and converted each into anime style using Flux Kontext Dev workflow in ComfyUI.
Now, we put all the 10 original images into first folder(Before) and the generated anime stylized 10 images into second folder(After).
2. Next, do renaming of every images pair should be same, other wise you will get errors and the result will be inaccurate.
For ex- First image in Before folder= image_1.jpg , then first image in After folder=image_1.jpg and so on.
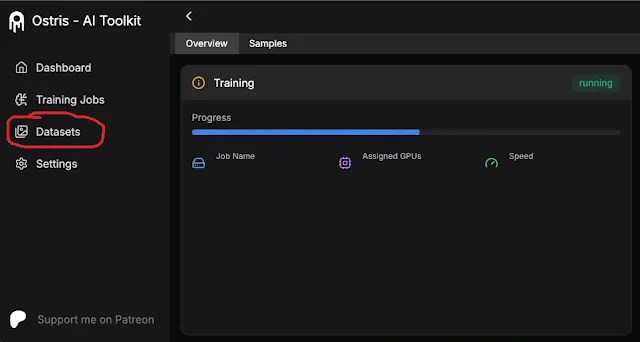
3. Select the "Dataset" option on left of AI-toolkit UI dashboard.
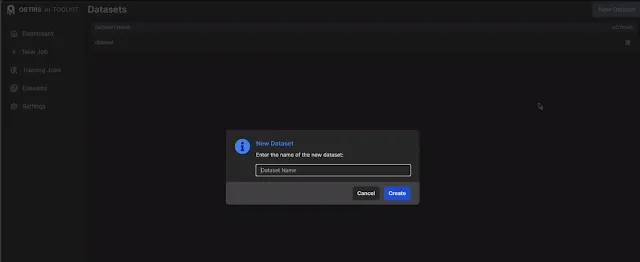
Select "New Dataset" option and create same three folders (Before, After and Test), then again select these three folder one by one that you created earlier and upload these images to their respective folder into Ai-Toolkit.
4. Do captioning by creating prompts with same trigger word for each image of After folder as we illustrated on above image. This trigger word will be used for your Kontext LoRA style while prompting. Be descriptive and relative while prompting each images.
For instance- make this girl into kon2ani style. Here, kon2ani is the trigger word. Add same captions with each of them. You need to add yours but be unique and relative.
Leave captioning for Before and Test folder. Now, time to start our Training process.
Initiate LoRA Training
1. Head over to "New Job" option of Ai-Toolkit UI dashboard. Fill the training name anything relative. We used the trigger word as the name to make it relative and clear differentiation.
Then, select "Flux Kontext Dev" from the MODEL CONFIGRUATION option.
2. Add your After folder to Dataset and Before folder to Control Dataset. On the Resolution option deselect the 1024 resolution, if you have RTX 3090/4090.
This does not handle training on high resolution. RTX 5090 users can select 1024 resolution. Leave the rest as it is.
3. Move to the Sample prompt section as shown above. You need to add prompts (as you do for Flux Dev Kontent) in these format as explained below for all Test's folder images:
Do this for all 5 images with their respective image path of Test folder.
Rest, leave everything as default. Finally, select on "Create Job" on the right top. This will add the new job to the dashboard.
4. Select "Training jobs" on left panel and click Play button to start the training. You can see real time status on the pop-up command prompt. You can control, edit, start, resume, delete you training where ever left.
This will download and install all the models from Hugging Face repository of Black Forest labs and start the training process.
5. The training process will take couple of hours, usually 3-4 hrs for good output. You will get your LoRA model into the output folder as [.safetensors] file extension.
Use your Kontext LoRA Model
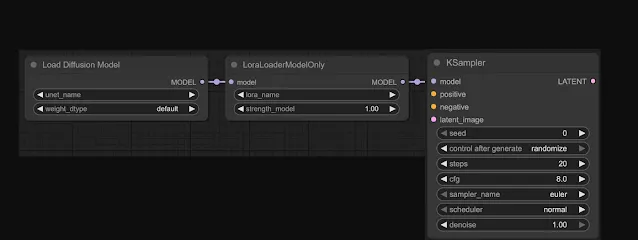
1. Use Flux Kontext dev workflow with "LoRA loader Model only" node in ComfyUI.
2. Connect the node to Load Diffusion model node and KSampler node.
3. Put your trained Kontext LoRA model into "ComfyUI/models/loras" folder. Select and load your generated Kontext Lora file into LoRA loader model only node.
4. Choose and load your original image to convert. Put prompt with your trigger word.
5. Hit Run button to generate.
Important points to consider
1. After initiating training if you do not see anything on command prompt. Simply close it and restart the process from the dashboard.
2. You can check periodically how much LoRA quality you need by moving to Dataset option then click Samples tab. Your uploaded images (Test folder) will be converted to your LoRA style in each 10-15 epochs.
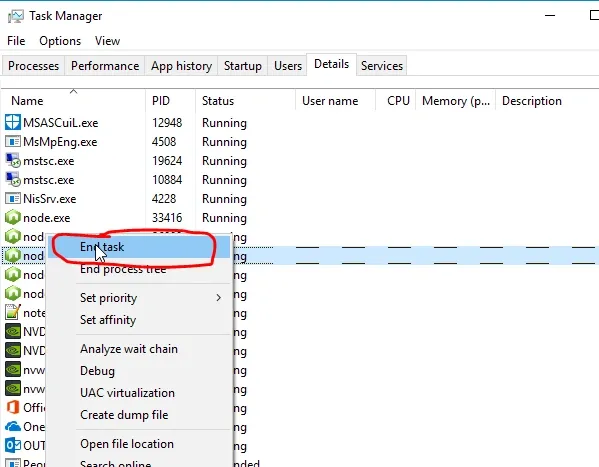
3. If you have closed the AI-toolkit, restarting and encountered with error- "Operation permitted rename....". This means your NodeJs is already running in the background. Just switch to your command Task manager and kill the NodeJs application by selecting "End task".


